
In Kubernetes, service discovery is the mechanism that allows pods to find and communicate with other applications without needing to know their IP addresses.
The Problem
Pods are ephemeral:
- A pod can be created, deleted, or restarted at any time.
- Each pod gets its own IP address.
- IP addresses change when pods are recreated.
If applications connected directly to pod IPs, communication would constantly break.
The Solution: Services
Kubernetes introduces a Service object that provides a stable network endpoint.
Example:
apiVersion: v1
kind: Service
metadata:
  name: my-api
spec:
  selector:
    app: api
  ports:
    - port: 80
      targetPort: 8080
Suppose you have:
Pod A: 10.244.1.5
Pod B: 10.244.2.8
Pod C: 10.244.3.7
The Service gets a stable virtual IP (ClusterIP):
my-api -> 10.96.0.15Applications talk to:
10.96.0.15:80instead of talking directly to pods.
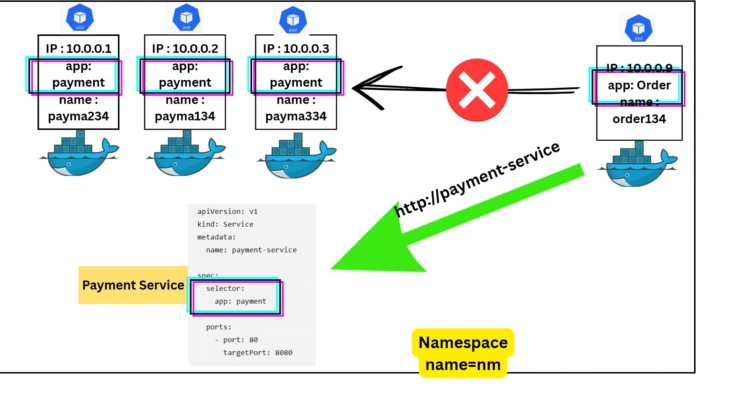
How Kubernetes Knows Which Pods Belong to a Service
The Service uses a label selector:
selector:
  app: api
Pods with:
labels:
  app: api
are automatically added as endpoints.
Kubernetes continuously updates the endpoint list when pods are added or removed.
Service Discovery via DNS
Most applications don’t use the Service IP directly.
Kubernetes runs DNS (typically CoreDNS) inside the cluster.
When a Service named:
my-apiexists in namespace:
defaultDNS automatically creates:
my-api.default.svc.cluster.localand also a shorter name:
my-api(for clients in the same namespace).
Example
Application code:
requests.get("http://my-api/users")DNS resolves:
my-api
   ↓
10.96.0.15
and traffic reaches one of the backend pods.
What Happens Internally
Step 1: Service Creation
You create:
kind: Service
metadata:
  name: my-api
Kubernetes API Server stores it.
Step 2: Endpoint Discovery
The EndpointSlice controller watches pods matching:
selector:
  app: api
and creates EndpointSlices:
10.244.1.5
10.244.2.8
10.244.3.7
Step 3: DNS Record Creation
CoreDNS watches the Kubernetes API and creates records:
my-api.default.svc.cluster.localStep 4: Client Lookup
A pod executes:
curl http://my-apiThe pod’s /etc/resolv.conf points to cluster DNS.
DNS query:
my-apireturns:
10.96.0.15Step 5: Traffic Routing
The request goes to the Service virtual IP.
Network rules managed by kube-proxy (or eBPF-based solutions like Cilium) load-balance traffic to one of the healthy backend pods.
Example:
Client Pod
     |
     v
Service (10.96.0.15)
     |
     +--> Pod A
     +--> Pod B
     +--> Pod C
Service Discovery Across Namespaces
If a service is in another namespace:
paymentsuse:
my-api.paymentsor fully qualified:
my-api.payments.svc.cluster.localHeadless Services
Normal service:
clusterIP: 10.96.0.15Headless service:
clusterIP: NoneDNS returns pod IPs directly:
db.default.svc.cluster.local
   ↓
10.244.1.5
10.244.2.8
10.244.3.7
Commonly used by stateful applications such as Apache Kafka, Apache Cassandra, and databases running in StatefulSets.
Summary
The service discovery flow is:
Pods
  ↓ (labels)
Service
  ↓
EndpointSlices
  ↓
CoreDNS creates DNS records
  ↓
Application queries DNS
  ↓
Service IP returned
  ↓
kube-proxy / Cilium load-balances
  ↓
Backend Pod
Key components involved:
- Service → stable endpoint.
- Labels & Selectors → identify backend pods.
- EndpointSlices → maintain pod IP list.
- CoreDNS → DNS-based service discovery.
- kube-proxy/Cilium → route traffic to pods.
This DNS-based approach is why applications in Kubernetes can simply call http://my-service even though the actual pods behind that service may change constantly.